Ootheca Watch: A 6-Week Countdown and Checklist for Hatching Day
Hello mantis friend, there’s a special kind of magic in watching an ootheca – that papery, mysterious egg case – and knowing that in a few weeks, it could burst with dozens of tiny, curious mantis nymphs.
This article gives you a clear, week-by-week guide to nurturing your mantis ootheca from day one right up to hatching day, so you can welcome your new arrivals with confidence.
While the process seems straightforward, it’s easy to miss subtle signs or misjudge conditions, which is why we’ve broken it down into manageable steps.
Here are the key things you’ll learn:
- How to create and maintain the ideal humidity and temperature for your ootheca’s development.
- Weekly milestones to track, from the first colour changes to the tiny movements inside.
- A simple checklist for hatching day to keep nymphs safe and settled.
- Common mistakes to avoid, based on our own experiences with mantises like Luna and Moss.
Understanding Your Mantis Ootheca
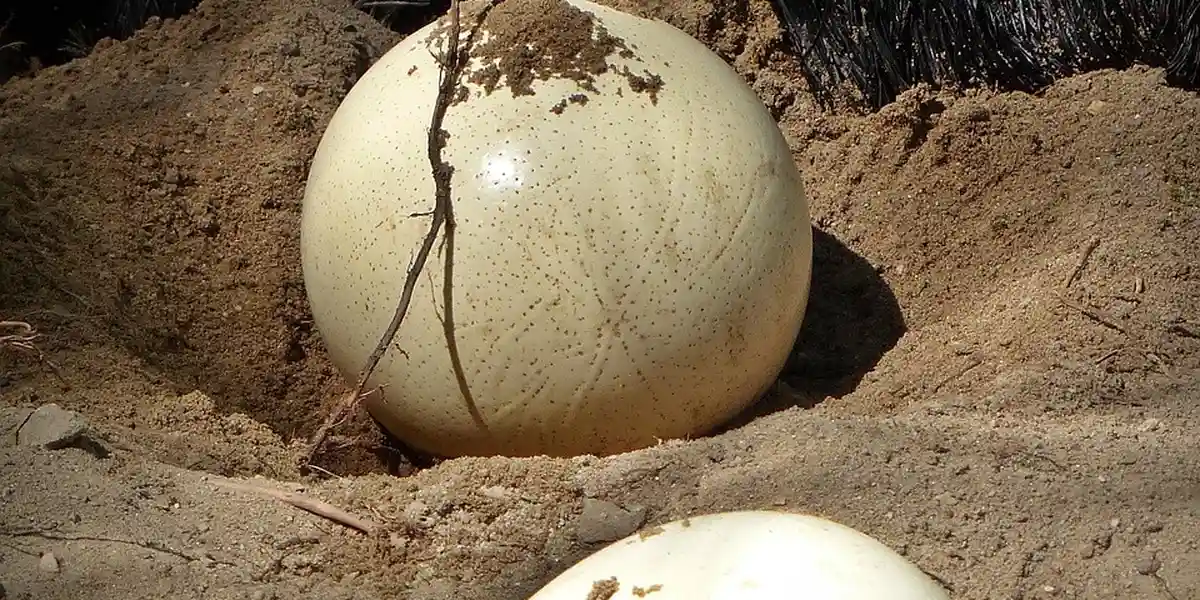
An ootheca is the protective foam-like case where your mantis lays her eggs, a remarkable natural cradle that safeguards the next generation. This sturdy structure shields the delicate eggs from drying out, predators, and temperature swings, giving them the best chance for successful development. Proper care for mantis ootheca is essential in a captive environment.
Inside, dozens of eggs develop within individual chambers, a process entirely dependent on environmental conditions. Hatching timing isn’t fixed by a calendar but is triggered by a sustained period of warmth that mimics the arrival of spring, telling the nymphs it’s safe to emerge.
A healthy ootheca typically has a uniform, firm texture and a consistent pale tan to light brown colour. You want to watch for a smooth surface without any dents, cracks, or a shrivelled appearance, which are all positive indicators.
Potential issues include the presence of fuzzy mold, which suggests excessive moisture, or a ootheca that feels unusually soft or emits an unpleasant odour. Any noticeable dark, sunken spots can signal that the eggs inside may not be viable and the development has halted.
The 6-Week Countdown Schedule
Weeks 1-2: Initial Setup and Monitoring
- Gently inspect the ootheca for any physical damage like deep cracks or abnormalities in its shape that could compromise the eggs inside.
- Set up a digital hygrometer and thermometer right beside the ootheca to accurately track the ambient temperature and humidity levels.
- Establish a consistent, light misting routine, using warm water to maintain humidity without making the ootheca itself soaking wet.
Weeks 3-4: Mid-Incubation Adjustments
- Check carefully for any white or green fuzzy mold growth, and if spotted, slightly increase air flow around the ootheca to dry it out.
- Monitor temperature stability closely, as consistent temperatures above 90°F can force a premature and often unsuccessful hatch.
- Begin preparing your tiny nymph enclosures, like deli cups with mesh lids, and gather your initial food source, such as flightless fruit flies.
Week 5: Final Preparations
- Increase how often you observe the ootheca, looking for the subtlest early signs like a slight darkening of the case or a change in texture.
- Ensure all your hatchling care items-enclosures, food cultures, fine misters, and twigs for climbing-are assembled and within easy reach.
- Double-check that every enclosure lid is secure and any ventilation holes are too small for a pinhead-sized nymph to possibly squeeze through.
Week 6: The Final Countdown
- Watch for clear visual cues like the ootheca turning a darker brown and the appearance of tiny, shadowy shapes or slight movements visible through the foam.
- Maintain optimal humidity and a steady, warm temperature right up until the moment hatching begins to support the nymphs during their final push.
- Keep a simple hatch day checklist handy for quick reference, listing tasks like “transfer nymphs gently” and “offer first feed within 48 hours.”
Preparing for Hatching Day
Setting Up the Hatching Enclosure
We always start by selecting a clear plastic container with a snug-fitting lid, as it lets you watch the magic unfold while keeping tiny nymphs safely inside. Secure ventilation is key-we poke small holes in the lid or use fine mesh to allow fresh air flow without any escape routes.
- Choose an appropriate container with secure ventilation-a large mason jar or small critter keeper works beautifully for up to 50 hatchlings, and we double-check edges for gaps.
- Add safe substrates like paper towels or sphagnum moss; paper towels are absorbent and easy to replace, while moss holds moisture for that gentle humidity boost hatchlings adore.
- Include hiding spots and climbing surfaces for hatchlings-think twigs, fake leaves, or crumpled paper strips, which give them places to feel secure and explore right away.
Gathering Essential Supplies
Having everything on hand before hatching day saves you from frantic dashes to the pet shop. We keep a dedicated “hatch kit” with small enclosures, a fine mist sprayer, and live food cultures ready to go.
- List must-have items: small enclosures like deli cups for individual nymphs, a fine mist sprayer for gentle hydration, and food cultures such as fruit flies or pinhead crickets-these are non-negotiable for newborn mantises.
- Include backup options for temperature control, like DIY incubators made from a heated mat under the enclosure or a warm spot near a radiator, which help maintain a steady 75-80°F if your room cools unexpectedly.
- Recommend easy-to-find household alternatives for beginners-substitute small jars for enclosures, use a spray bottle from the kitchen, and offer freshly hatched brine shrimp or small aphids from garden plants if cultures aren’t available.
On Hatching Day: What to Expect and Do
Recognizing the First Signs of Hatching
You might notice the ootheca darken slightly and develop tiny splits, often in the early morning when humidity peaks. The first nymphs emerge head-first, wriggling out like miniature acrobats, and they’ll cling to nearby surfaces while others follow over several hours.
- Describe the appearance of emerging nymphs and ootheca changes-nymphs are pale and delicate, about the size of an ant, with the ootheca looking frayed or “unzipped” as they exit.
- Note the typical hatching process duration and nymph behavior-hatching can take 2-6 hours, with nymphs staying still at first to harden their exoskeletons before becoming active climbers.
- Share personal anecdotes to illustrate common observations-with Luna, our Ghost Mantis, we saw her ootheca split silently at dawn, and the nymphs huddled together like a soft, moving carpet until they dispersed.
Managing the Hatch
Stay calm and avoid sudden movements to keep the hatchlings stress-free. We use a soft paintbrush or piece of paper to gently coax nymphs into their new homes, never touching them directly to prevent harm. In the L1 Nymph Diaries, this is part of a day-by-day guide to raising hatchlings. Stay tuned for more daily care tips.
- Steps to safely transfer hatchlings to their new enclosures-first, mist the area lightly to encourage movement, then guide them one by one into prepared cups with a brush, and seal lids securely.
- Tips for minimizing stress and preventing injury during handling-work in a quiet, well-lit space, limit handling to under 30 seconds per nymph, and avoid overcrowding to reduce competition.
- How to provide immediate access to food and water sources-place a few fruit flies in each enclosure right away and mist the sides lightly for drinking, as hatchlings need to eat within 24 hours to thrive.
Caring for Your New Mantis Hatchlings
Feeding First Instar Mantids
Your tiny mantis nymphs need the right food to thrive from day one. We find that offering live prey encourages their natural hunting instincts and supports healthy growth.
- Suitable live prey includes flightless fruit flies or pinhead crickets, which are small enough for first instar mantids to catch and consume safely.
- Feed your nymphs every day or every other day, providing just a few prey items per mantis to prevent overfeeding or stress.
- Maintain a steady supply by culturing fruit flies at home, and occasionally introduce varied prey like springtails to boost nutritional intake.
Housing and Environment for Hatchlings
Creating a cosy, secure space helps your hatchlings feel at home. A well-set enclosure mimics their natural habitat and reduces the risk of mishaps during delicate stages.
- Use small, ventilated containers like deli cups with fine mesh lids to maintain airflow while keeping humidity around 60-70% with light daily misting.
- Keep temperatures steady between 70-80°F (21-27°C), avoiding direct sunlight or heat lamps that could dry out or overheat the nymphs.
- Watch for molting signs like reduced movement and appetite, then ensure plenty of vertical surfaces like twigs for hanging as they grow into later instars.
Troubleshooting Common Ootheca Issues
Dealing with Mold and Humidity Problems
Mold can appear if conditions aren’t quite right, but it’s often manageable with a few adjustments. Gentle handling and better airflow usually resolve minor mold without harming the ootheca.
- Mold typically stems from excessive moisture or poor ventilation; carefully brush it off with a soft, dry tool and reduce misting frequency.
- Balance humidity by misting lightly every other day and ensuring enclosures have adequate cross-ventilation to prevent stagnant air.
- Dispel myths like ootheca requiring temperatures over 90°F to hatch; most species do well at moderate room temperatures without extreme heat.
What If Hatching is Delayed or Fails?
Patience is key, but sometimes hatching doesn’t go as planned. We’ve learned that checking environmental factors first can often pinpoint the issue before considering intervention.
- Delayed hatching may result from inconsistent temperatures, low humidity, or an infertile ootheca; review your setup for steady warmth and moisture levels.
- If hatching hasn’t occurred after 6-8 weeks, gently consult experienced keepers or online forums for advice before attempting any physical checks on the ootheca.
- For a non-viable ootheca, handle it respectfully by placing it in a garden or compost to return nutrients to the soil, avoiding disposal in household waste.
Essential Supplies for Ootheca Incubation and Hatching
Incubation Equipment
-
You will need a reliable thermometer to monitor temperature, as mantis eggs thrive best between 75-85°F. Consistent warmth encourages healthy development and prevents delays in hatching. Temperature and humidity requirements are crucial for successful mantis egg incubation.
-
A hygrometer helps track humidity levels, aiming for 50-70% to keep the ootheca from drying out or molding. We find digital models easier to read, but analog ones work well for basic checks.
-
Incubators range from simple DIY setups, like a plastic tub with a heat mat, to commercial units with digital controls. DIY options save money and let you customise the space, while commercial ones offer hands-off precision for busy keepers.
-
For budget-friendly choices, repurpose a clear container with vents and a small heat source, avoiding direct heat on the ootheca. This approach works wonderfully if you check conditions twice daily, just as we did with Moss’s clutch last season.
-
Maintain steady conditions by placing the setup away from drafts and sunlight, using a timer for heat sources if possible. Small, daily adjustments prevent sudden shifts that could stress the developing nymphs.
Hatchling Care Items
-
Stock up on live food like flightless fruit flies or pinhead crickets, which are small enough for newborn mantises to catch. Having a culture ready ensures your hatchlings eat within hours of emerging, reducing stress. Also, avoid prey that’s too large for newborns—stick to tiny live foods until they grow larger.
-
Use small enclosures like deli cups or miniature terrariums with fine mesh lids to contain tiny nymphs. These spaces make it easier for them to find food and feel secure in their new home.
-
A fine-mist spray bottle provides gentle hydration without drowning delicate hatchlings. Light misting once or twice a day mimics morning dew and keeps humidity ideal.
-
Choose safe substrates such as paper towel or coconut fibre, which are easy to clean and resist mold. Avoid loose soils that might harbour pests or cause impaction if ingested.
-
Add natural decor like sterilised twigs, silk leaves, or small rocks to create climbing spots and hiding places. This setup encourages natural behaviours and makes hatchlings like Sprig feel at home in a mini-habitat.
-
Store extra supplies in sealed containers away from moisture, and clean enclosures with warm water between uses. Proper storage extends the life of your items and keeps everything ready for future clutches.
FAQs on Mantis
Can high temperatures above 90°F trigger ootheca hatching?
Yes, sustained heat over 90°F can force an early hatch in some mantis species. However, this premature emergence often leads to underdeveloped or non-viable nymphs. Temperature also affects mantis growth and development more broadly, influencing growth rate and molting timing. Warmer conditions can speed development, but extremes can compromise final size and health.
What happens if my ootheca is exposed to temperatures over 90°F?
Excessive heat can cause the ootheca to hatch too soon, resulting in weaker nymphs with lower survival chances. If yours hatched earlier than expected, it may have been exposed to higher temperatures or temperature fluctuations. Monitoring heat and humidity can help prevent premature hatching due to heat. Always aim for stable, moderate temperatures to support healthy development.
How do I handle a premature hatch due to high temperatures?
Focus on providing high humidity and offering small, live prey like fruit flies immediately. Temperature and humidity are also important factors for mantis nymph care. They need stable humidity and temperatures within their species’ preferred range to molt and grow properly. Keep the nymphs in a controlled, cooler setup to minimize stress and support their recovery.
Your Mantis Hatching Journey Awaits
Over the six-week countdown, we’ve shared how to monitor temperature, humidity, and feeding prep for your ootheca. Following this step-by-step checklist ensures your mantis nymphs emerge healthy and ready for their new home. In our praying mantis breeders journal, we document the full 60 days from pairing the ootheca. This log helps you track milestones and stay on top of care as the nymphs develop.
Caring for these delicate creatures is a gentle responsibility that deepens with each life stage. We encourage you to keep learning and refining your approach, creating a thriving environment where your mantises can flourish. For practical, step-by-step advice, consult our care pet praying mantis complete handling behavior guide to learn safe handling and clear behavioral cues. It will help you recognize stress signals and respond with gentle care.
Further Reading & Sources
- ARBICO Organics: It’s Ootheca Time!
- Care for Mantis Eggs | Mantid Forum – Mantis Pet & Breeding Forum
- Ootheca Life Cycle Praying Mantis Egg – USMANTIS
- breeding – When will mantis eggsacks hatch if kept at room temperature? – Pets Stack Exchange
Rowan Hale is a lifelong insect enthusiast who fell in love with mantises for their calm presence, alien elegance, and surprising personalities. After years of keeping and raising a variety of species, Rowan shares practical tips, creative insights, and real-world experience to help others enjoy the quiet magic of mantis care. From setting up the perfect enclosure to understanding their subtle behaviors, Rowan invites readers into a gentle, curious world where every tiny movement feels like a discovery.
Egg Care